How to Get More Donations by Tweaking Your Donation Form
If you’re a nonprofit fundraiser, the question of how to get more donations is always at the top of your mind. Could you do more promoting on social media? Would your donors react well to an additional email campaign? What about adding yet another event to your fundraising schedule?
Before you start adding more campaigns to your to-do list, try making these changes to your online donation forms! These simple tweaks will make your form more effective by creating simpler, more appealing donation processes for your donors. You’ll improve your form’s conversion rates, inspire larger gifts, and encourage recurring donations. Here’s how!
1. Split your donation form into multiple steps
For a long time, having donors fill out all their information on a single form was best practice. The idea was that donors would be more likely to finish a gift if all information was collected at once.
As donor behaviors and preferences changed, people started noticing that conversion rates increased if the giving process was split into a couple of very simple steps. Instead of having all your donation form’s fields visible at once, start by showing donors only some suggested donation amounts. Then, after they’ve entered how much they’d like to give, move them onto the next step.
By the time a donor chooses a donation amount and clicks the button to move to the next step of the giving process, they’ve already decided to give. Everything else is just a formality!
Why does this work? We suspect it’s because of the way donors make decisions. Think of it this way:
With single-step forms, donors select their donation size, enter their personal and billing information, answer any additional questions you may have added (hopefully not many—the more fields you add to your form, the lower conversion rates will be), and click to donate. It’s all one step, but it’s a long process! In one place, they decide to give and then do everything they need to do to process that donation. Their decision to give isn’t clinched until the very end of the process when they click that “donate” button.
Multi-step forms, on the other hand, are slightly different. The donor decides to give, selects their donation amount, and moves to the next stage. The decision to give is made; everything else is just a formality. While they can still navigate away from the donation form mid-transaction, they tend to do so less frequently. The act of moving them forward from the part of the form where they enter their donation amount solidifies the decision to give in their brain and indicates progress.
It’s a small change but transitioning your form from a single-step to a multi-step process could have a huge impact on your donation form’s conversion rates! Give it a try—if you (or your donors) don’t love it, just switch it back.
2. Streamline your donation form
Removing nonessential fields—even if you’ve split your form into multiple steps—is a simple way to ensure donors finish the giving process. Take a look at your donation forms: are you asking donors for any information that’s not necessary for processing their donation? Consider removing those fields!
Some extra fields, of course, may be necessary for certain campaigns. You may need to ask donors to choose which fund they’d like to support or ask them if they’d like to dedicate their donation to someone. But nonessential questions—like where the donor heard about your organization, communication preferences, program interests, etc.—don’t belong on your form.
If you need to collect more information about your supporters, try sending them surveys after they donate! Drop a link to your donor survey on your donation confirmation page, include it in your automated receipts, or send it to donors in future updates.
Another step you can take is using conditional fields. Conditional fields only appear during the donation process under specific conditions. For example: when your donor makes a gift and indicates that she’s dedicating her gift to someone, an additional field will pop up asking her if she’d like to send an email to the dedicatee. If she doesn’t dedicate her gift to anyone, she never sees the second field! Conditional fields are a good way to move donors quickly through the donation process without distracting them with irrelevant fields, while still making sure to gather all relevant information.
3. Enable recurring donation options
Do you have recurring gift options on your donation form? If you don’t, try adding them! Having a dedicated donation form for this type of gift is common, and it’s great for instances when you’re appealing specifically for ongoing support. But adding recurring options to your general donation form is a simple way to boost the likelihood of sustaining gifts from donors, even if they never land on your recurring campaign’s page.
Once you enable recurring options on your form, there are two ways to draw them to your donors’ attention.
The first is a simple note about monthly gifts and the impact they can make. This note can be included on your form during the first “step” where the donor chooses how much to give. Adding this subtle call to action is a great way to catch your donor’s eye as they set up their gift!
The second is a modal that pops up when a donor finalizes their gift. It gives them the option to convert their one-time donation to a recurring donation. This is an eye-catching approach that grabs a donor’s attention! You can choose one method or another, or you could combine both approaches. Play around with your options and see which works best for your organization!

Adding a pop-up modal that includes an ask for recurring support is a bold way to promote your recurring giving program.
4. Add photos that tell the story of your organization
It’s an overused phrase, but the old idiom “a picture’s worth a thousand words” is true! Adding a high-impact image or two to your form will help you catch donors’ eyes, connect them to the people they’ll help by donating, and inspire them to give.
There are two opportunities to add images to your form—experiment with them and see which you like! The first place you can add an image is at the top of your donation form. Your goal here is to choose an image that makes potential donors feel connected to the people (or animals) their gift will support. Make the biggest impression by choosing an image that:
Focuses on an individual person: Humans connect to other humans (or animals to which we ascribe human emotions). Choosing an image with one focused subject helps people feel connected to the people they’re supporting on a personal level. A small group of people or animals—two to three subjects in your photo—can also be effective.
Includes eye contact: Humans love eye contact! We’re hardwired to react to it. If your photo’s subject (or group of subjects) are making eye contact with the donor, they’ll feel even more emotionally connected to your cause. You could also consider adding a photo that may not include eye contact, but instead makes donors feel like they’re peeking in on a special moment.
Feels uplifting or positive: Remember that Sarah McLaughlan ASPCA commercial with the sad puppies and the mournful song? Every time it came on, I’d mute the TV. It didn’t make me want to donate—it just made me sad! Your donors are the same way: instead of motivating people to be generous, sad photos on donation forms cause poorer performance than forms that include positive, uplifting imagery. If you want to use a before-and-after photo for your form, put the visual emphasis on the happy “after” and not the sad “before.”
The second place you can try adding images is in your suggested donation amounts. When you suggest amounts for donors to give (instead of, say, letting them punch in their own donation amount with no suggestions), they tend to give more.
Adding an impact statement or description to each suggested amount improves form performance, and enhancing each suggestion with a photo performs even better. You’ll always want to give donors the option to enter their own donation amount, but these suggested donation amounts can be very powerful when coupled with an impactful narrative.

Telling donors their gift will provide care for an abandoned infant is powerful. Adding a photo of an infant takes this organization’s appeal to the next level!
Here’s an example. I want to raise money for a local animal shelter. My options are:
Weakest: Ask donors to enter their own donation amount with no suggestions
Stronger: Give donors a range of suggested donation amounts with the option to enter their own amount
Even stronger: Give donors a range of suggested donation amounts (plus a space for them to enter their own amount) with a description for each level, ex: “A $20 donation can provide two weeks’ worth of food for a shelter pup.”
Strongest: Give donors a range of suggested donation amounts (plus a space for them to enter their own amount) with a description and an accompanying photo. Ex: a photo of a happy puppy next to some food with a note saying “A $20 donation can provide two weeks’ worth of food for a shelter pup.”
5. Switch up your buttons and field labels
Looking for a small way to make a big impact? Try changing the language on your buttons or your fields! It’s a subtle way to add a little of your nonprofit’s personality to your form. If you decide to go this route, think about some simple ways you can use updated wording to make donors feel appreciated and at ease. Try:
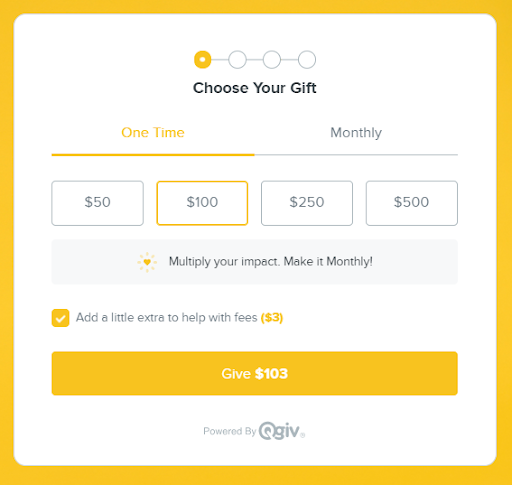
Switching out your “Donation Amount” heading for something like “Choose Your Gift!”
Saying “Yes! Send me occasional updates and exciting news” instead of something more general, like “Sign me up for emails”
Using something like “Save a Life!” or “Feed My Community” instead of “Donate” or “Confirm” on the final button at the bottom of your form

At the top of their donation form, this organization made a note about how a donor’s gift can multiply in impact. Then they changed the language on their “Donate” button and added more language about multiplying impact, which makes donors feel great about their gift.
Anything you can do to surprise and delight your donors—especially if it reinforces their decision to give and reiterates their impact—will leave a favorable impression on your donors.
Bonus Tip: Don’t remove security certificates
It may sound counter-intuitive, but those (admittedly unattractive) security certificates at the bottom of your donation form actually help you improve conversion rates on your donation forms. While they may not fit your form’s aesthetic, they do make donors feel more comfortable giving you their personal information and payment methods! Resist the temptation to remove those certificates with some fancy CSS: having visible security certificates on your donation form can help you raise more money online.
Conclusion
You don’t necessarily have to reinvent the wheel to get more donations. Sometimes a few simple changes to your donation forms can have an impact!
Improve conversion rates by splitting your donation form into two or three short steps instead of offering one long donation form. Then, make the donation process even more effortless by removing extraneous fields and using conditional fields to streamline the process.
Enable recurring donations on your donation form, even if it’s not the form you have set up specifically to support your recurring donor program! Keep your donors connected to your cause and reiterate the impact their gift can make by including emotionally compelling photos and personalized language. Combined, these steps can improve conversion rates and boost overall gift size by making the giving process quick, easy, and charming.
Curious about how any of these tips will affect your form? Experiment with our Interactive Donation Form Templates!
Looking for more donation form best practices? Check out these additional resources:
About the Author:
Abby Jarvis is a blogger, speaker, and general nonprofit nerd. When she’s not working at Qgiv, Abby can usually be found digging around in her garden, hiking around nature preserves and parks, or visiting local breweries with her husband.